To shine chrome sink fixtures that have a lime buildup, use a paste made of 2 tablespoons salt and 1 teaspoon white distilled vinegar.
Make your own scouring cleanser by combining 1/4 cup baking soda with 1 tablespoon liquid detergent. Add just enough white distilled vinegar to give it a thick but creamy texture.
Clean counter tops and make them smell sweet again with a cloth soaked in undiluted white distilled vinegar.
Clean and deodorize a drain by pouring in 1 cup baking soda, then one cup hot white distilled vinegar. Let this sit for 5 minutes or so, then run hot water down the drain.
Deodorize the garbage disposal by pouring in 1/2 cup baking soda and 1/2 cup hot white distilled vinegar. Let sit for 5 minutes then run hot water down the disposal.
Deodorize and clean the garbage disposal with white distilled vinegar ice cubes. Make them by freezing full-strength white distilled vinegar in an ice cube tray. Run several cubes down the disposal while flushing with cold water.
Clean the microwave by mixing 1/2 cup white distilled vinegar and 1/2 cup water in a microwave-safe bowl. Bring it to a rolling boil inside the microwave. Baked-on food will be loosened, and odors will disappear. Wipe clean.
Clean the shelves and walls of the refrigerator with a half-and-half solution of water and white distilled vinegar.
Cut the grime on the top of the refrigerator with a paper towel or cloth and full-strength white distilled vinegar.
Avoid the bad smell when you heat up a newly cleaned oven by using a sponge soaked in diluted white distilled vinegar for the final rinse.
To clean a grease splattered oven door window, saturate it with full-strength white distilled vinegar. Keep the door open for 10 to 15 minutes before wiping with a sponge.
Remove soap buildup and odors from the dishwasher by pouring a cup of white distilled vinegar inside the empty machine and running it through a whole cycle. Do monthly.
To prevent good glassware from getting etched by minerals, wash then spray with full-strength white distilled vinegar. Give the glasses a hot water rinse before letting them dry or drying them with a towel.
For cloudy glassware, soak paper towels or a cloth in full-strength white distilled vinegar and wrap around the inside and outside of the glass. Let sit awhile before rinsing clean.
Get rid of lime deposits in a tea kettle by adding 1/2 cup white distilled vinegar to the water and letting it sit overnight. If more drastic action is needed, boil full-strength white distilled vinegar in the kettle a few minutes, let cool and rinse with plain water.
Remove mineral deposits from coffee makers with white distilled vinegar. Fill the water reservoir with 1 cup or more of white distilled vinegar and run it through a whole cycle. Run it once or twice more with plain water to rinse clean. (Check the owners’ manual first.)
Remove stains from coffee and teacups by scrubbing them gently with equal parts of salt (or baking soda) and white distilled vinegar. Rinse clean.
For stained and smelly plastic food containers, wipe them with a cloth dampened with white distilled vinegar.
Remove odors from a lunch box by placing inside a slice of bread that has been soaked in white distilled vinegar. Leave overnight.
Remove ugly film in narrow-necked glass jars, flower vases, and bottles by letting undiluted white distilled vinegar sit in them for a few hours. Add a little rice or sand and shake vigorously to loosen stubborn stains. Repeat if necessary.
Easily clean your mini blinds by wearing pair of white cotton gloves. Dip gloved fingers into a solution of equal parts white vinegar and warm tap water, and run your fingers across both sides of each blind.
To clean tarnished brass, copper, and pewter, use a paste with equal amounts of white distilled vinegar and table salt.
Make a metal cleanser by adding enough white distilled vinegar to 2 tablespoons of cream of tartar to make a paste. Rub it on and let it dry on the surface. Wash it off and dry with a soft cloth.
Polish brass and copper with a mixture of 2 tablespoons of ketchup and 1 tablespoon white distilled vinegar. Rub it on with a clean cloth until dry and shiny.
Remove dark stains on an aluminum pot by boiling a mixture of 1 cup white distilled vinegar and 1 cup hot water.
Discourage ants by spraying undiluted white distilled vinegar outside doorways and windowsills, around appliances and wherever you find the pests coming in.
Get rid of fruit flies by setting out a small dish of undiluted white distilled vinegar.
Clean the wheel of a can opener using white distilled vinegar and an old toothbrush.
Remove the smell of spoiled food from a refrigerator by first rinsing the area with soap and water. Spray surfaces with full-strength white distilled vinegar and wipe them down with a damp cloth or sponge. Fill some containers with baking soda and place inside. Close the door and leave for a few days.
Wipe grease off exhaust fan grids, the inside of your oven, or anywhere grease gathers with a sponge soaked in white distilled vinegar.
To make cleaning the grill easier, spray a solution of half water and half white distilled vinegar on the cooking surface.
To remove a label, decal, or price tag, cover with a cloth soaked in white distilled vinegar. Leave the cloth on overnight and the label should slide off.
Renew sponges and dishrags by placing them in just enough water to cover them. Then add 1/4 cup white distilled vinegar. Let them soak overnight.
Get rid of calcium deposits on faucets by soaking a cloth or paper towel in white distilled vinegar and wrapping the area tightly. Let this sit for a couple of hours or overnight.
Remove soap buildup from faucets by scrubbing them with a solution of 1 part salt to 4 parts white distilled vinegar.
Rid a faucet of lime deposits by tying a plastic bag containing 1/2 to 1/3 cup of white distilled vinegar around it and leaving it there for two or three hours. If mineral deposits don’t wipe off, scrubbing with an old toothbrush should complete the job.
Shine colored porcelain sinks by scouring them with undiluted white distilled vinegar.
Rinse away soapy film on countertops with a solution of white distilled vinegar and water.
Clean grout by letting full-strength white distilled vinegar sit on it for a few minutes and scrubbing it with an old toothbrush.
Kill germs all around the bathroom with a spray of full-strength white distilled vinegar. Wipe clean with a damp cloth.
To remove grime, mildew, and scum from the tub, tile, shower curtain or door, wipe with undiluted white distilled vinegar. Rinse with water.
Spray shower doors with full-strength white distilled vinegar after you’ve squeegeed the glass, or before you step in and turn on the water. It will help release the hard water deposits so they don’t remain on the glass.
Mix up an inexpensive tile cleaner by adding 1/2 cup baking soda, 1 cup white distilled vinegar, and 1 cup ammonia to a gallon of warm water.
Get rid of stubborn bathtub film by wiping it with white distilled vinegar and then scouring with baking soda.
Soak a sponge or loofah overnight in a strong white distilled vinegar and water solution to remove dirt and slime. Rinse several times with cold water and let air dry (in the sun if possible).
Clean shower door tracks by filling them with white distilled vinegar and letting it sit for a few hours. Pour hot water into the tracks and wash and scrub away the scum with a toothbrush.
To clean a scummy showerhead, pour 1/2 cup baking soda and 1 cup white distilled vinegar into a sandwich bag and tie it around the showerhead. Let this set for an hour after the bubbling has stopped. Remove the bag and then turn on the water.
Deodorize the toilet bowl by allowing 3 cups white distilled vinegar to sit in it for about a half hour before flushing.
To make the toilet bowl sparkle, pour in a cup or more of diluted white distilled vinegar and let it sit several hours or overnight. Scrub well with the toilet brush and flush.
Freshen air in the bathroom by spraying into the air a solution of 1 teaspoon baking soda, 1 tablespoon white distilled vinegar, and 1 cup water.
Get a shining finish on a no-wax vinyl or linoleum floor by cleaning it with a solution of one cup white distilled vinegar for every gallon of water.
Apply full-strength white distilled vinegar directly to tough linoleum stains. Leave it on for 10 to 15 minutes before wiping it up. If that doesn’t work, apply white distilled vinegar again and then sprinkle some baking soda over the white distilled vinegar. Scrub the area with a brush or sponge. Rinse clean with water.
For an economical and environmentally friendly floor cleaner, mix a solution of 3 drops dishwashing liquid to 1/3 part white distilled vinegar, 1/3 part alcohol, and 1/3 part water. Spray sparingly and mop for a fast clean-up.
Some carpet stains can be removed with a paste of 2 tablespoons white distilled vinegar and 1/4 cup salt or baking soda. Rub into the carpet stain and let dry. Vacuum up the residue the next day. (Always test on an out-of-sight part of the carpet first).
Bring out the color in carpet by brushing it with a solution of 1 cup white distilled vinegar for every gallon of water. (Always test on an out-of-sight part of the carpet beforehand).
To reduce soap bubbles in a steam cleaner add about 1/4 cup white distilled vinegar. Use the same amount in the rinse water to remove detergent residue and make carpets stay fresh longer.
Wash indoor/outdoor carpet with a solution of 1 cup white distilled vinegar in 1 bucket of warm water. Scrub using a brush or a broom and then hose off.
Clean up pet accidents by first blotting up the area and then adding a white distilled vinegar-and-water solution. Blot until it is almost dry. Then sprinkle baking soda over the area and let it dry. Vacuum up the residue the next day.
Create your own window cleaning solution by combining 1/2 cup non-sudsy ammonia, 1 cup white distilled vinegar, and 2 tablespoons cornstarch in a gallon of water.
Remove the wax residue left by commercial window cleaners with a solution of 2 cups water, 1 cup white distilled vinegar and 1 teaspoon of liquid soap or detergent.
To remove paint from windows try using undiluted, hot white distilled vinegar. Give the solution time to soften the paint before removing with a razor edge tool.
To remove paint splatters from windows apply full-strength white distilled vinegar with a clean paintbrush.
Get rid of mildew, dust, and stale odors by wiping down walls with undiluted white distilled vinegar on a cloth or a sponge mop.
Clean woodwork and walls with a mixture of 1 cup white distilled vinegar, 1 cup baking soda, 1/2 cup ammonia and 1 gallon warm water. Wipe on with a sponge or damp—not wet—towel.
Clean wood paneling with a solution of 1/4 cup olive oil, 1/2 cup white distilled vinegar, and 2 cups warm water. Wipe on with a soft cloth.
Remove wallpaper easily by using a paint roller to wet the surface very thoroughly with a solution of equal parts white distilled vinegar and hot water. Or spray on until saturated.
Get decals off walls or doors by letting undiluted white distilled vinegar soak into them for several minutes before trying to peel them off. Repeat if necessary.
Remove white water rings from wood with a solution of equal parts white distilled vinegar and vegetable oil. Rub with the grain.
Remove fireplace soot and grime with undiluted white distilled vinegar. Use a brush to scrub and a towel to blot up the wetness and dirt.
Clean fireplace glass doors with a solution of 1 part white distilled vinegar to 2 parts water. Spray or wipe on, then wipe clean with a dry cloth.
To kill germs, spray full-strength white distilled vinegar on doorknobs and then wipe them dry.
Remove the smell of a dead mouse or other rodent (after removing all animal remnants) by wiping down the area with either white distilled vinegar or bleach. Then place a fabric softener sheet in the area to remove any lingering odors.
Never use white distilled vinegar on marble. The acid can damage the surface.
Before painting old concrete, clean with full-strength white distilled vinegar. Let it air dry.
Clean hardened paint brushes by simmering them in a pot with white distilled vinegar. Soak them first for an hour before bringing the white distilled vinegar to a simmer. Drain and rinse clean.
Remove mud and stains from plastic, fiberglass, or aluminum sports equipment by applying a paste of 1 part white distilled vinegar to 3 parts baking soda. Wipe off with soapy water and rinse with clear water.
Clean your grill by spritzing white distilled vinegar over wadded up aluminum foil and scrubbing the grill vigorously with it.
To remove film in glass baby bottles, fill with equal parts hot water and white distilled vinegar. Let sit for at least an hour. Scrub with a bottle brush.
To clean and disinfect baby toys add a good-sized splash of white distilled vinegar to soapy water.
Clean vinyl baby books or board books by wiping with white distilled vinegar. Wipe clean with a damp sponge or cloth.
Clean scissors that have become sticky (after cutting tape, for instance) with a cloth dipped in undiluted white distilled vinegar.
Clean and deodorize urine on a mattress with a white distilled vinegar and water solution. Then sprinkle the area with baking soda and let dry. Brush or vacuum the residue after it is dry to the touch.
Shine pennies by soaking them for a couple of hours or overnight in a glass or bowl of undiluted white distilled vinegar.
Friday, December 30, 2011
Family Cook Book
I come from a Long Line of Chefs! My Father worked on the Vegas Strip for over 40 years. He cooked for the Rat Pack, Elvis, and even Howard Hughes. He has some amazing recipes! My Grandmothers were amazing cooks and they made cookies that would make you beg! My sister's are all cooks, pastry chefs, or just really good. I think almost all of them have worked in the Culinary Arts at one time or another. (PS I am a Doula/Childbirth Educator because I can't cook).
I can follow a recipe and if I had something like this to hold all those great family recipes than I know I could get better.
I can't wait to get one!
How to Remove Acrylic Paint from Clothes
how to remove acrylic paint from your clothes claudinehellmuth.blogspot.com
A question I get asked over an over again is "how do you remove acrylic paint from your clothes?"
All acrylic paints can be tricky to remove from your clothes once dry, but I have a little method that I'll share with you. While it's not foolproof - it works about 99% of the time. You can always give it a try! Hey your shirt already has paint on it, what's the worst that can happen!?
 Here's a jacket sleeve that I got a little bit of purple paint on. This purple is from my Claudine Hellmuth Studio line of paints. These paints were designed to be extra waterproof when dry so you can use them to paint fabrics. Good for painting fabrics. Not good when you get them on something you would rather not have paint on. I was wearing this jacket at the CHA convention and it was in my suitcase a couple of days before I realized I had paint on it. Oops!
 Not to worry! Rubbing Alcohol to the rescue! You'll want just regular Rubbing Alcohol that you can get from your drugstore or grocery store.
Using a paper towel completely soak the area with the dried on paint. Use A LOT of Rubbing Alcohol and get the area 100% saturated. The resins in the paint will be broken down by the rubbing alcohol.
 With your fingernail (or here I am using a coffee stirrer), scratch at the area gently going with and against the grain of the fabric. Keep applying more Rubbing Alcohol to lift off the stain.
 At a certain point you get as far as you can with the stain. Here I can still see it a little bit, but it's much better than what I started off with! Throw it in the wash right away and usually even more of the stain will be removed in the wash cycle.
 Here it is after it's been through the wash and dried. Very hard to tell where the stain was and one of my favorite jackets is now ready to wear again!
Thursday, December 29, 2011
Wednesday, December 28, 2011
Tip to Save Money on Paint Brushes

I used white distilled vinegar the other day on the brush I used to paint Goo's room (and forgot to clean) and it worked amazing!
Tuesday, December 27, 2011
Clean your Toys!

I do this monthly! Don't be suprised though if you find your little ones trying to stick their toys in with the dinner dishes. Heaven knows Gouda sneaks them in all the time.
Monday, December 26, 2011
Easy Way to Clean your Oven with no Heavy Chemicals!

The best oven cleaner! Cover bottom of oven with baking soda, then pour vinegar so it's all wet. Let sit around 20 minutes or so then wipe all of it out with damp cloth or sponge. I leave my oven door open too. After drying you may see some white residue, wipe again.
I hate cleaning my oven because that Easy Off stuff kicks up my asthma and I always end up needing a breathing treatment. I think I will try this next week and see how it works. We all know how much I love cleaning with Vinegar!
Scroll to Top
Sunday, December 25, 2011
Friday, December 23, 2011
How to Make Bath Fizzies - from Martha!
All it takes to make delicately scented tablets is a little mixing, some gradual spritzing, and a few minutes of molding. When you're finished you'll have dozens of effervescent treats in a variety of shapes and colors that will scent and soften bath water as they bubble. Stuff stockings with cellophane bags filled with stacks of the colorful blocks. They make great gifts for all the ladies on your list, including mothers, grandmothers, aunts, and grown-up nieces. Experiment with colors and scents; mix yellow and red to make orange, for example, and try blending lemon with lavender.
Tools and Materials
1. Sift 1 3/4 cup baking soda, 1 cup citric acid, and 2 cups cornstarch through a sieve to remove chunks. To make different tints, fill small spritzer bottles with water and add about 6 drops of food coloring to each.
2. Pour 1 cup of powdered mixture into a glass bowl. Lightly spritz, stirring after each spritz, until powder is desired color. Add water slowly, so mixture does not fizz. If mixing two tints, alternate colors as you spritz. Check the consistency of powder with your fingers; when it can be tightly packed or shaped, stop spritzing (this may take a little while).
3. Select an essential oil. Add 5 drops if it's one of the stronger scents (peppermint, lavender), 6 if it's a weaker one (lemon, grapefruit). Mix well. Firmly pack mixture into small baking molds. We used 1/4 cup for each fizzy, which is good for one bath. Allow mixture to set for 2 hours, then pop out carefully. Repeat with different tints for remaining powder.
All it takes to make delicately scented tablets is a little mixing, some gradual spritzing, and a few minutes of molding. When you're finished you'll have dozens of effervescent treats in a variety of shapes and colors that will scent and soften bath water as they bubble. Stuff stockings with cellophane bags filled with stacks of the colorful blocks. They make great gifts for all the ladies on your list, including mothers, grandmothers, aunts, and grown-up nieces. Experiment with colors and scents; mix yellow and red to make orange, for example, and try blending lemon with lavender.

Tools and Materials
- Baking soda
- Cornstarch
- Citric acid
- Spritzer bottles
- Food coloring
- Glass bowl
- Essential oil
- Baking molds
1. Sift 1 3/4 cup baking soda, 1 cup citric acid, and 2 cups cornstarch through a sieve to remove chunks. To make different tints, fill small spritzer bottles with water and add about 6 drops of food coloring to each.
2. Pour 1 cup of powdered mixture into a glass bowl. Lightly spritz, stirring after each spritz, until powder is desired color. Add water slowly, so mixture does not fizz. If mixing two tints, alternate colors as you spritz. Check the consistency of powder with your fingers; when it can be tightly packed or shaped, stop spritzing (this may take a little while).
3. Select an essential oil. Add 5 drops if it's one of the stronger scents (peppermint, lavender), 6 if it's a weaker one (lemon, grapefruit). Mix well. Firmly pack mixture into small baking molds. We used 1/4 cup for each fizzy, which is good for one bath. Allow mixture to set for 2 hours, then pop out carefully. Repeat with different tints for remaining powder.
All it takes to make delicately scented tablets is a little mixing, some gradual spritzing, and a few minutes of molding. When you're finished you'll have dozens of effervescent treats in a variety of shapes and colors that will scent and soften bath water as they bubble. Stuff stockings with cellophane bags filled with stacks of the colorful blocks. They make great gifts for all the ladies on your list, including mothers, grandmothers, aunts, and grown-up nieces. Experiment with colors and scents; mix yellow and red to make orange, for example, and try blending lemon with lavender.
Thursday, December 22, 2011
Recipes for homemade soap
The following homemade soap recipes vary in difficulty. Not all of them use lye. Some of them are simple re-batching or “melt and pour” recipes which are more suitable if you want to keep it simple. Shea butter soap recipe: coconut oil and shea butter are awesome for dry skin. This is a very basic recipe to which you could add essential oils for fragrance. If you have sensitive skin that reacts badly to many ingredients, this may be just the sort of very simple soap you need.
- Cucumber soap recipe: cucumber is actually an astringent. This recipe harnesses its supposed curative properties along with its wonderful scent.
- Vegan lavender soap: made from olive oil and palm kernel oil instead of animal fat, with the relaxing fragrance of lavender.
 Lollipop soap: terrific for kids or as a party favor. Yes, it’s soap on a lollipop stick.
- Chocolate soap: you’ll find a variety of chocolate soap recipes there, and some are vegan. Some add flavors like orange or vanilla, which will give you ideas for your own recipes.
- Milky Rosebar soap recipe: uses goat’s milk, which is moisturizing, and rose petals, which are used to prevent signs of aging. Looks and smells gorgeous!
 Coffee and Cream soap: this recipe is melt and pour – no lye! Very easy for beginners or even supervised kids, and fantastic smelling.
- Apple Tart soap: another easy melt and pour recipe. Red and apple-scented.
- Dead Sea mud bar: a mild exfoliant with a stress-relieving ginger and grapefruit scent.
- Vanilla and Almond soap: a “re-batching” recipe that’s all about the delicious
 scent and not drying out skin.
 - Oatmeal soap: I love oatmeal soap for my sensitive skin. This recipe is so simple: Dove + oatmeal = whole new soap.
- Spicy Tea Glycerin soap: add tea and dried flowers to boring bars of glycerin soap.
- Avocado oil soap: just what it sounds like. Avacado is awesome for all types of skin.
- Ginger coconut lime soap: this one’s all about the scent, but it comes out with a pretty green swirl, too.
Wednesday, December 21, 2011
Build your own Toy Kitchen #2
Build your own Toy Kitchen
Virginia's directions for building your own Ikea-based toy kitchen:
I took a RAST table and built off of that. First I added a sheet of 1/4 inch birch ply to make a back. Then I used the scraps to divide the shelf inside into 2 halves. I used another scrap to make a door and 2 to trim out the place where the knobs would go and for the "kickplate". I spent 10 bucks on the wood (I asked if they had any scraps they could sell in lieu of a large sheet). They did the cuts for free.
To assemble it, I used wood glue and screws. I added ATTEST knobs to the front and PANNA coasters for burners. I cut a hole in the top and used an old bowl I had lying around for a sink. For the shelf to store dishes, I found a small GRUNDTAL shelf in the bathroom section. I cut another piece of scrap wood to make the shelf more suitable for storing items.
A few GRUNDTAL "S" hooks are perfect for hanging pots and pans. The spoons, etc are stored in a FNISS pen/pencil holder. It was all a little low, so I bought NUMERAR legs to bring it up to play height. I had planned to add a handle for the door and a tile backsplash, but I ended up leaving it as is.
Thanks so much for sharing this inspiring project, Virginia!
Edited to add: Virginia took the time to draw up the following schematic and dimensions, for those who are interested in making this kitchen. Thanks again, Virginia!


Tuesday, December 20, 2011
Build your own Toy Kitchen Idea #1
My Dad is a Chef, my Aunts, Uncles, Brothers, Sisters, Cousins, Nieces, and Nephews all cooks or chefs of some type. My son Goo has a plastic play kitchen were he refers to himself as a "cooker". He tells me he wants to grow up and be a "cooker" too. I can't cook and I don't pretend otherwise. I don't like to do it and it makes me feel dumb! I hate feeling dumb! However, if Goo wants to follow in the family DNA I'll going to let him. The plastic kitchen is falling apart and he keeps asking for a new one. I'd prefer one that isn't plastic or going to fall apart as soon as he gets it. I found this one on Pintrest! I love that site!
Here is the pictures!

Here is the pictures!
Monday, December 19, 2011
My New Task List

I've been telling myself for awhile now that I need some sort of chart or organization for house cleaning. If not I seem to aimlessly clean. I love this one I found on Pintrest and I'm going to try to follow it and see how it goes.
Tuesday, December 13, 2011
Clean with White Distilled Vinegar
Cleaning

White distilled vinegar is a popular household cleanser, effective for killing most mold, bacteria, and germs, due to its level of acidity. Cleaning with white distilled vinegar is a smart way to avoid using harsh chemicals. You’ll also be glad to know that it is environmentally friendly and very economical.
Monday, December 12, 2011

Sunday, December 11, 2011
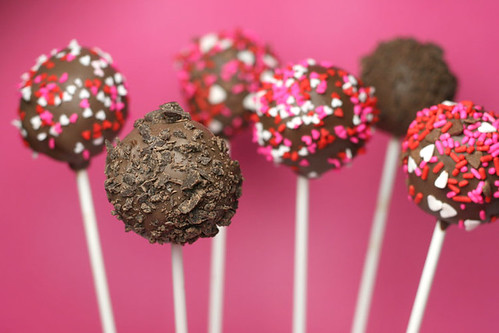
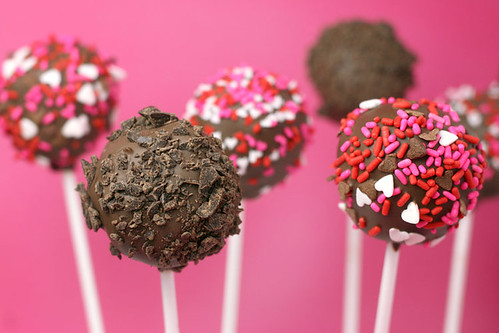
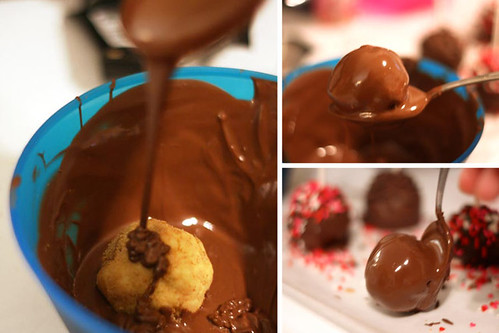
Cheesecake Pops from bakerella.com
Cheesecake Pops!

The pops I was seeing were part of a Daring Bakers Challenge where tons of bloggers tackle a new dessert each month and that month they had coincidentally picked cheesecake pops inspired by the book Sticky, Chewy, Messy, Gooey
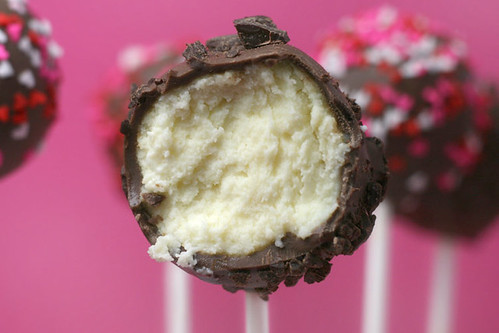
And, it didn’t hurt any that I had half a plain jane cheesecake sitting in the refrigerator waiting to be experimented on.
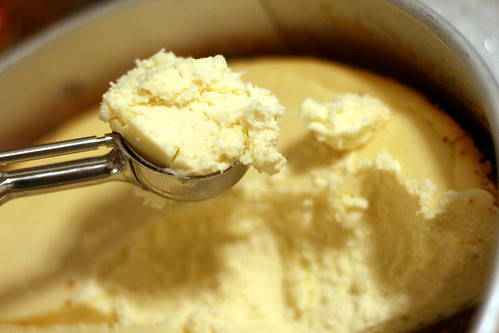
I used a small ice cream scoop and scooped up as many balls as I could, trying not to scrape the graham cracker crust into it. I didn’t want it to look ugly, you know. I guess, if I was going to make these on purpose, I would bake my cheesecake in a regular 2-3″ high cake pan and not use a crust at all.
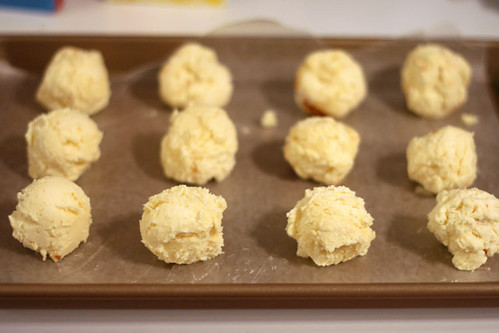
I got 12 easy, from half of the cheesecake. I could have probably squeaked out a couple more, but I might have eaten a few sections of cheesecake along the way. Maybe.
I didn’t really roll these, but I did kind of shape them a little to make them more round.
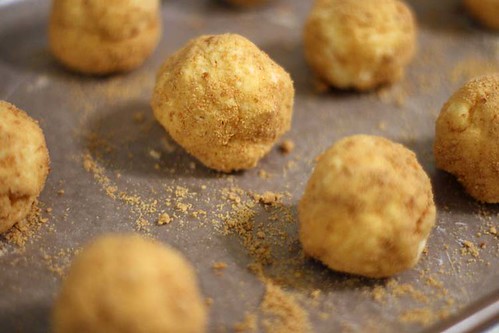
And, then because they were lumpier than I am used to with the cake pops, I dropped each one in a small bowl filled with graham cracker crumbs and rolled it around to coat. This helped to shape them better as well.
Then, I popped them in the freezer for a few minutes to firm up. (Maybe about 20-30 min. for these.)
While they were chilling. I heated up some chocolate candy melts in the microwave (30 sec intervals, stirring in between) and got my sticks and decorations ready.

I went with teeny tiny hearts in red, white and pink. A hearts and jimmies mix in red, white pink and brown … and also just some dark chocolate that I chopped up in a mini food processor.
Note: I’m pretty sure a few of you are going to want to know where those baking cups came from. Check out www.confectioneryhouse.com
So, after the balls became firm, I dipped one end of my lollipop stick in some of the melted candy coating and then inserted it into the cheesecake ball. I immediately dunked the pop in a deep bowl of melted candy coating and then sprinkled to decorate. Each one was then placed in a styrofoam block to completely dry. Then, they went in the refrigerator to await their fate.
Note: It will really help if you use a bowl that is deep enough to completely submerge the pop in chocolate and remove in one motion. It also helps if your chocolate is on the thinner side. (You can melt a little shortening in it to thin it out some.) Once, you remove it, carefully tap the excess off while balancing the pop on the stick. You may need to rotate your hand so that gravity keeps the pop in place long enough for the chocolate to start to set around the base. Add the decorations before it sets too much also or they won’t stick to the surface. These were slightly harder to manage than the cake pops. One… they were larger and heavier because of using the scooper. Two… the cheesecake texture wasn’t as sticky as the cake pop mixture.
But… I think they turned out beautifully.
Let’s take a closer look…
A little closer.
Closer.
Whoops, just couldn’t resist. YUM-O-RAMA!
So, you say you don’t want to do a balancing act to make all these on sticks. Here’s another way you can do it. And it’s easier.
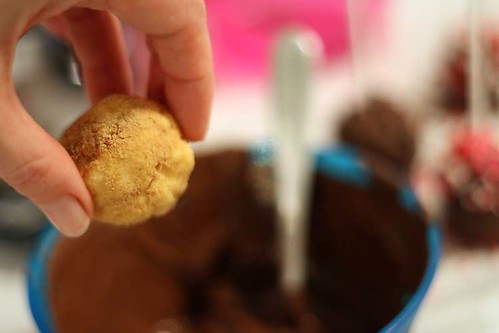
Take your graham cracker-coated cheesecake ball and drop it in the bowl of melted candy coating.
Don’t stir it. Just spoon some chocolate over the top until it is covered. Then, scoop it out with a spoon and tap off some of the excess by tapping the spoon on the side of the bowl. Then, just let it slide right off onto some wax paper. Insert your stick and add any decorations. Told you this was easier. I didn’t tap these as much as I do regular cake balls because I was going for the Sticky, Chewy, Messy, Gooey

Messy looks good, too, don’t you think?
If you want to make some Cheesecake Pops … you will need:
Cheesecake (Buy one if you want to get straight to the fun stuff. Shhh… I won’t tell. You can also use this recipe.)
Mini ice cream scoop
Dark chocolate, chopped
Graham cracker crumbs
Dipping bowl
Styrofoam block
and…
Sticky, Chewy, Messy, Gooey
You can also check the Google results for the Daring Baker’s Cheesecake Pop Challenge and see tons more versions to drool over.
Enjoy!
Bakerella
Saturday, December 10, 2011

Friday, December 9, 2011
Holiday Tip # 1
to cardboard for your Christmas ornament decorations to store for the rest
 |
| Glue plastic cups to cardboard to store Christmas Ornaments |
Thursday, December 8, 2011
T'was the Night Before or 17 Days till Christmas
And all through the house Sher was stirring trying to make PJ's.
I know a lot of people out there have the Night Before Christmas Pajama's tradition. Growing up we always had new pajamas to go to bed in. Well, my parents had a habit of forgetting which package the pj's were in and sometimes the one package (usually the pjs) we got to open before going to bed ended up being a sweater or new panties. Most of the time it was the pajamas. C had this tradition as well. This year with Goo and Gouda being old enough to really get excited for Christmas I wanted to make the tradition really sparkle and so I thought I would customize their pj's. This is how I did it. I bought new pj's that match. Not an easy task when you have one boy and one girl but I did! I found really nice ones for $7.00 a piece.
I know a lot of people out there have the Night Before Christmas Pajama's tradition. Growing up we always had new pajamas to go to bed in. Well, my parents had a habit of forgetting which package the pj's were in and sometimes the one package (usually the pjs) we got to open before going to bed ended up being a sweater or new panties. Most of the time it was the pajamas. C had this tradition as well. This year with Goo and Gouda being old enough to really get excited for Christmas I wanted to make the tradition really sparkle and so I thought I would customize their pj's. This is how I did it. I bought new pj's that match. Not an easy task when you have one boy and one girl but I did! I found really nice ones for $7.00 a piece.
 |
Step 1 Gather supplies. What you will need: Iron Iron on letters to spell out kids names (or nickmanes) you can pick theses up for cheap at any craft store. I got mine at Michael's for under $5.00 I don't own a Ironing board so I placed a towel down on the kitchen countertop. A rag to place over the Letters to prevent burning and slippage. (this step I discovered after I did Gouda's PJ's) |
 |
| Trim up the letters so you can place them all on the pj's |
 |
| Letter Trimmed (yes pic is upside down) |
 |
Place Iron on rag (just a few seconds or you can burn it)  |
Monday, December 5, 2011


Subscribe to:
Posts (Atom)